How I Saved My Chairs And Wallet My Way
After four kids (one of them still in progress only just now able to reach the sink to wash his own hands), my gorgeous table chairs with the cream cushions were done. So, since I didn’t want to pay anyone else, here’s how I made them over myself for less than $50.

First I decided to find a video so I could review the process–since the last time I recovered chairs was before YouTube was even a thing. After all, surely the Information Highway could enhance my redecorating knowledge.
Right?
Step One of the Fourteen Step video started with removing the chair seats.
Check.
On board so far.
Step Two suggested (although didn’t necessarily recommend) the old material be removed.
Nope, that was more trouble than it was worth. Besides, I wanted to KEEP all the stains since they were the evidence of great memories.

So scratch that.
Step Three started with math and ended without me. It said to measure the chairs and then add three times the length of the sides plus the square root of the circumference or something like that. Seriously? That was when I stopped watching and decided to do my own thing. (Ok, maybe there wasn’t anything about the square root…)


My chairs turned out amazing.

Steps to take my chairs from MESSED UP to MAGNIFICANT (only 3-7 count).
- Review a video on YouTube about recovering chair cushions so I don’t mess it up.
- Completely ignore the video.
- Buy new fabric that I love.
- Unscrew cushions.
- Eye-ball where to cut the fabric–then cut.
- Staple fabric over the old stained stuff.
- Screw seats back in place.
- Done!
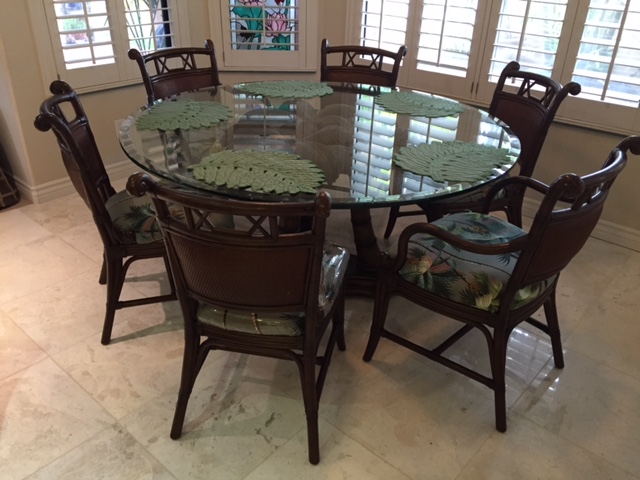
I’ll never forget the day I found my perfect table. Hello gorgeous Tommy Bahama palm tree pedestal with beveled glass top and six sweet rattan chairs!
I swore I would NEVER get another glass table, even though I loved them, until the kids were old enough to keep their slimy fingers from smearing it the moment I finished my windex wipe down–since it simply wouldn’t stayed clean longer than ten minutes.
But the kids were quickly moving through high school so, as far as I could see, the road ahead was perfectly clear of table slime and grime. I wasn’t even worried about the cream colored cushions. After all, THESE chairs were NEVER going to be subjected to the DAILY, whoops-I-dropped-my-juice, eating-SpaghettiOs-with-fingers abuse of a young child in my house–ever again.
Right?
What my math challenged brain failed to add into the equation were my children’s future offspring–especially the one who became a permanent resident–waiting in the wings.
Ta-Da!!
Which brings me to today.
But this time I am smarter. I covered two of my beautiful new chairs with plastic. So bring on the SpaghettiOs!
Plus, I have a staple gun and I’m not afraid to use it!
Please share your comments. I’d love to hear what you think!

About The Author
Laura
Lover of reading, writing, sparkly things and whatever purrs, barks or flies. Former helicopter mom, co-dependent and enabler, I am addicted to walking, my family and my iWatch. Teacher by day and writer by night, I am clearly the one learning the most. Keeping it up until I get it right. Choosing joy one day at a time and sharing my journey so others can see why it might not be found if we don’t look for it. Thanks for stopping by!
Related Posts
How To Make Decluttering Absolutely Magical PART TWO: Check This Out
This post contains affiliate links but all opinions are mine. HOW I ORGANIZED A SMALL…
How To Make Decluttering Absolutely Magical: Check Out What I Did
This post includes affiliate links however all opinions are mine. I would love to…
Lisa | 23rd Jun 16
I am from your school of redecorating! Just plunge in! The chairs look great! Plastic covers for the kids was a nice (smart) touch.
AB | 23rd Jun 16
Beautiful post, beautiful chairs and all from your beautiful heart.
LKCadmin | 24th Jun 16
Awww– thanks Allison! I really appreciate your support!
Kari Ann | 23rd Jun 16
What a beautiful transformation! I love how these little updates can save so much money.
LKCadmin | 24th Jun 16
Thanks, Kari! Yes, it’s really a cheap way to add some serious upgrades. Well worth the time and effort.
JoJo Tabares | 23rd Jun 16
Very pretty! Well done.
LKCadmin | 24th Jun 16
Thanks, Jojo!! I love it too.